What you read in this article:
Use Git
My name is Arsalan Mirbozorgi and in this article I want to introduce you to the Git command archive. So much open source software is being used in the IT world. Git is one of the version control software which is a part of open source software. The main task of these softwares is to manage the source code and review the distributed source code. The main focus of this software is on tracking changes related to computer files and activities performed on it.

What is git?
As we explained to you earlier, Git is an open source software that is responsible for version control. The main task of this software is to manage the source code and to review the distributed source code, and this software is used in software projects, but it can also be used to check for changes related to a set of files.
How to install git?
Git and GitHub are very different from each other. You should not confuse these two. To install the Git, go to https://git-scm.com/ and follow the installation steps according to the instructions on the site. You can also go to https://desktop.github.com/ to install GitHub, and after installation, you can easily manage the repositories you produce. GitLab is used in many projects. In this article, we are going to name the commands in this field. But you should know that GitHub and Git commands are not much different from each other.
 Usually in projects, gitlab is used more and in this article we mention more of these commands, but you should know that practically the orders of Gitlab and GitHub are not very different from each other.
Build SSH key for GitLab
If you want to access projects, you must create an SSH key on your profile. If you create this key, you can manage your project gateway without any problems. You must log in to your profile to create this key. In this section, there is a generator link to make the key in the lip gate. If you click on it, the desired key will be created for you and you can put it in the more specific box of your profile.
 For activating this code, you should open the terminal according to the desired path and enter this code:
ssh-keygen -t rsa -C "[email protected]"
Gi
Place the code you have made in the part specified in the image above and copied according to the following order:
pbcopy < ~/.ssh/id_rsa.pub
GitLab
The commands in git like that:
The way of building new repository on your computer:
git init [project name]
This command is to download from a repository (URL) that is existed on your system:
git clone MY_URL
For new files that have not yet been committed, and a list of changes made the following command is used:
git status
This command uses for adding all new files to the stage and preparing it to commit:
git add .
This command is to add the specific file you want to the stage and prepare to commit:
git add [file name]
This command is to comm all files on stage:
git commit -m "Description "
We add all the files at the same time, and we also specify a description for the commit section with the following command:
git commit am "Commit Description "
This command is for uploading and sending new files to the server and under the supervision of the branch where we are:
git push
We use this command for uploading and sending new files to the server and under the main master branch. But this is not normally done. So preferably we push on another branch and then we merge:
git push origin master
git pull
Next command is for receiving changes that have recently been made to the server and merge:
point: When you are working on a project in a team (for example, you are on a branch called example and the recent changes are made in the project are on the project test bench called the dev branch), In this situation, you don’t need to send a request and you will be able to get the latest changes from the dev brunch:
git pull origin dev
With using this command, you can define which branch you are in and in which branch your codes will be changed or received in git:
git branch
The following command is to get the latest changes from (no merge) origin branch:
(If we are in a branch and want to make change, if we have created the branch recently, we have to enter the following code to identify the branches and its changes.)
git fetch

or

git fetch --all
This command is for showing a list of all branches in git :
git branch --all

or

git branch
The following command is to change the branch to something else, for example to the Develop directory:
git checkout Develop
This command for creating a new Branch called New_Branch:
git branch New_Branch
This command is to display a list of all Branches and Local and Remote:
git branch -av
This command is to remove My_Branch from the list of all Branches:
git branch -d My_Branch
We use this command to Merge Branch_B into Branch_A:
git checkout Branch_A
git merge Branch_B
This command is use to display changes to files that have not yet entered the stage:
git diff
This command is to display changes to files that have been entered on stage:
git diff --cached
This command is to display all changes to files that have entered the stage, and also files that have not yet entered the stage (Unstage files):
git diff HEAD
This command shows the difference between the two commits:
git diff commit1 commit2
using this command will help you to see the list of all changes related to your desired file along with the date and name of the developer who made these changes:
git blame [File Name]
This command is for displaying a list of all file changes:
git log
This command uses to show the history of all changes along with their tag information:
git log --decorator
With using this command, you can see the history of the file/directory file change list along with their list of changes (diff) along the committees:
git log -p [file/directory]
The following command use to unstage a file with the new changes in git:
git reset [file]
This command is used to revert all changes from the last commit:
git reset --hard
This command is to show the list of tags that are available:
git tag
This command is used to add tags to the latest files and also add changes:
git push --delete origin TagName
This command is to remove the tag from the repository:
git push --tags
This command is used for deleting the generated tag on the local:
git tag -d TagName
With using this command, you can sends all the tags created on the monitor:
git push --tags
This command is for adding tags with their descriptions. After using this command, a new page will open and you can enter the description of the new tag in it:
git tag -a TagName
This command is used to create a tag with its specific description:
git tag -am "Description" TagName
This command use for showing the list of tags, along with a description of each tag:
git tag -n
Experience:
Sometimes we may not push the changes after applying and committing them, in this case we may need to go back as much as a commit, in this case we use this command:
git reset HEAD~1
Tips:
If we want to clone a project from the GitLab and run it on our computer, we can use this command:
git clone [email protected]:user/project-name.git
After executing this command, a folder named project-name that you previously created on git will be created on your computer. For example, if we want to pull our own project on the server and it needs to be cloned before that project, we may not want the project name to be the same on the GitLab and server, and pour its contents in a folder with the name we want. In this case, we use the following command:
git clone [repository] [local path]

or

git clone [email protected]:user/project-name.git example
Also, we can also enter the desired folder and do this with this command:
git clone [email protected]:user/project-name.git
Putting a dot at the end of the command is very important. If we do not write it, our project will be cloned as a repository.
Experience #1:
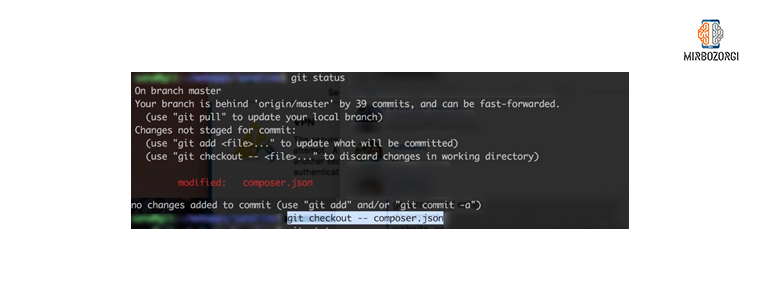
In one of our projects, a file called composer.json was accidentally modified on the server by a member of the group. This was not allowed when we wanted to make the latest changes to the server. Because first we have to determine the changes which we made to the server first.

As you can see in the picture, it is not possible to pull the latest changes until the modified file is reverted. We can use the following command to restore the file to its previous state:
git checkout -- filename
Experience #2:
Use the following command if you want to copy a complete brunch and place it on another brunch:
git checkout -b new_branch old_branch
Return the project to the desired commit
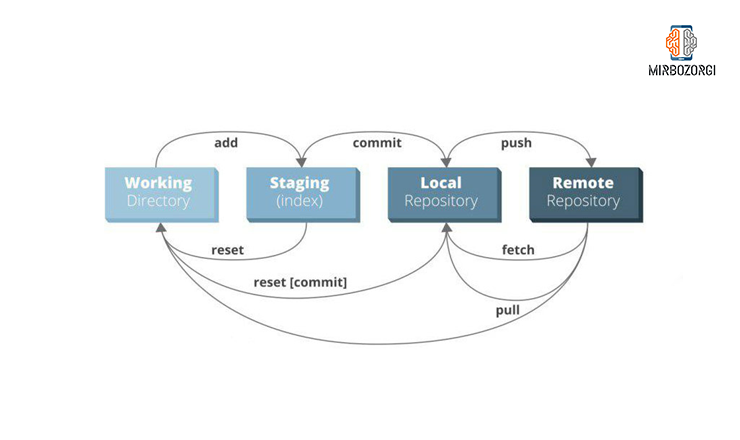
As we said later, with the reset git command, you can return the project to your desired commit, also in this situation, you must return to this commit with the following command and entering the ID which you like.
git reset COMMIT_ID
After doing this command, all the extra files created after committing remain, and you can save or delete them. But if you want to delete all the changes and extra files and just go back to the previous commit, you have to use the following command:
git reset --hard COMMIT_ID
Loading project on GitLab
After making a project in GatLab, you can create this project on your own locale by cloning. You may ask how we should do this if the project folder has already been created, and we want to upload it to the git?
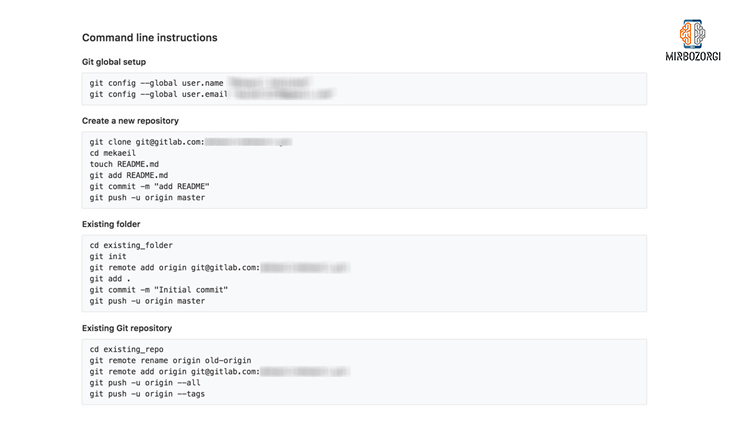
After making the project on GitLab, the following image will be displayed for you, which have some practical point:

As you can see in this picture, you have to do one of two things. Either you have to clone the project, or if the project folder is already saved and you want to put it on GitLab, run the following code:
cd existing_folder
git init
git remote add origin [email protected]:xxxxxxxxxxx
git add .
git commit -m "Initial commit"
git push -u origin master


Hello there, just become alert to your weblog via Google, and found that its truly informative. I’m gonna watch out for brussels. I will be grateful for those who continue this in future. A lot of folks will be benefited from your writing. Cheers!
I simply want to mention I am very new to blogging and site-building and really liked this web blog. Very likely I’m likely to bookmark your blog . You actually come with good writings. Appreciate it for sharing with us your blog site.
Thank you pertaining to sharing that excellent written content on your website. I ran into it on google. I am going to check back again once you publish much more aricles.