
What you read in this article:
Jenkins :
On the Mirbozorgi team, we want to talk to you about what Jenkins is, and tell of its main uses. Working with Jenkins is in the group of DevOps. Jenkins is an automation server with which you can perform many tasks all in all automatically.
![]()
In this article our goal is to update the main Realtime server when you merge master with brunch.
For example, suppose you have a Java backend and after a new feature is added, you want to update the server. If you want to do it in usual way, you first should pull in the gate and then pull in the main server. After creating a Docker Image you can run it with the Docker-Compose file. Or localize the Docker Image and transfer the Image. In the other way you can use Tomcat, which is not so usual today.
In all these ways, you have to follow a series of steps to update Production. Here we introduce the tool to you that updates the main server when the project is merged to the desired branch.
Step 1:
You must first activate login with the root user on your server. You can use this link.
Step 2:
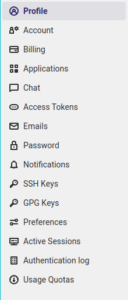
Build a user in your GitLab with api access and add the Access token to the jenkins dashboard.
You can build access token in the following path:
https://gitlab.com/-/profile
In the access token section, a token can be built.
Step 3:
The way of adding a GitLab user to jenkins:
Go to the following path:
Manage jenkins -> Configure system -> gitlab
And then fill in the required fields.
Alert: You may face an error while adding the Access token. In this situation, add credentials from the path below and go back to the previous path and continue the process.
Manage jenkins -> Configure Credential Providers -> (change providers and type to “Only selected”)
Manage jenkins -> Manage Credential -> add gitlab api token
Step 4:
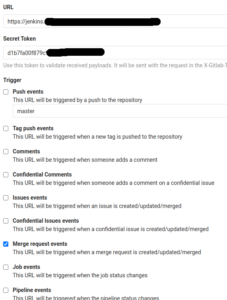
On the gitlab page of the project, go to the following path.
Setting -> Integrations
We enter the settings of this section according to the picture.
Step 5:
Install the following plugins in jenkins:
Publish Over SSH (for freeStyle project)
SSH Pipeline Steps
According to the image, after installation, go to the following address and build a new user.
Manage jenkins -> Manage Credential
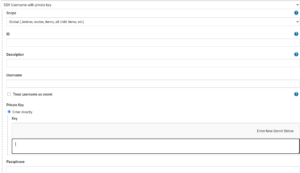
ID: Select an ideal ID but a unit.
Username: Enter the name of the user which you intend to log in to the destination server.
Alert: Note that the user must have the root access level.
Private key: In this section, we must first build an id_rsa file in the jenkins server with the following command code.
ssh-keygen -t rsa -m PEM
Then we transfer the file have been built in the .ssh folder to the destination server with this code on the jenkins server.
ssh-copy-id -i id_rsa root @ hostname
For testing, you can run the following code to successfully log in to the destination server:
ssh -i id_rsa root @ hostname
The private key field is still empty and to set it we have to open the id_rsa file and then enter all its contents in this section.
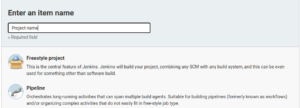
Step 6:
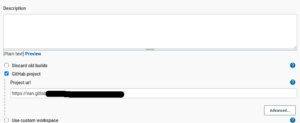
For adding a project, you should select the add item option and then, like the image above, after entering the project name, select the Pipeline option and you will be transferred to the project settings page.
In the picture above, in the GitHub project section, enter the GitLab/Github address of our project.
(There is no need to fill in the Description section)
In the Gitlab Server section, put the name that you assigned to your gitLab account in step one. And if it is necessary, you can choose other options.
Step 7:
In this section of the config file is important. Depending on our needs, we check the options when we want to do the build operation.
In the Build Triggers part, for solving problem to build, if it is merged from develop to master, we choose the Advance option and enter the following settings.
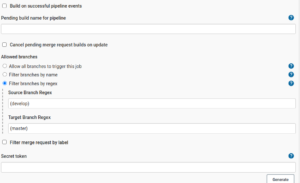
As you can see in the picture above, first select the Filter branches by regex option and then fill in the Source branch Regex and Target branch Regex fields according to the picture.
Step 8:
Go to the project configuration and choose the Pipeline Script option.
In the Script box, enter the following statements.
def remote = [:]
remote.name = "root"
remote.host = "127.0.0.1"
remote.port = 22
remote.allowAnyHosts = true

node {

git branch : 'master', credentialsId: 'e03b3798-0e67-4769-ssss94b3-7d6e696f', url: 'https://gitlab.com/server/mirbozorgi.git'

withCredentials( [sshUserPrivateKey(credentialsId: 'root-jenkins', keyFileVariable: 'identity', passphraseVariable: '', usernameVariable: arsalan)] ) {
        remote.user = arsalan
        remote.identityFile = identity
        stage("SSH Steps Rocks!") {
            writeFile file: 'deploy.sh', text: '''#!/bin/bash
                                                echo "Creating Dockerfile..."
                                                cd /root/arsalan/workdir/mirbozorgi_pipeline
                                                docker build --no-cache -t arsalan/mirbozorgi:latest . -f /root/arsalan/workdir/mirbozorgi_pipline/Dockerfile
                                                sed -i 's/127.0.0.1/127.0.0.1/g' /root/arsalan/workdir/mirbozorgi_pipline/docker-compose.yml
                                                sed -i 's/postgres_user_password/455sfdfdsfghrt8687ggjjjuu/g' /root/arsalan/workdir/mirbozorgi_pipline/docker-compose.yml
                                                sed -i 's/mongo_mirbozorgi/arsalan-mirbozorgi/g' /root/arsalan/workdir/mirbozorgi_pipline/docker-compose.yml
                                                sed -i 's/127.0.0.1/127.0.0.1/g' /root/arsalan/workdir/mirbozorgi_pipline/docker-compose.yml
                                                sed -i 's/mirbozorgi_user/admin/g' /root/arsalan/workdir/mirbozorgi_pipline/docker-compose.yml
                                                sed -i 's/mongo_user_password/455sfdfdsfghrt8687ggjjjuu/g' /root/arsalan/workdir/mirbozorgi_pipline/docker-compose.yml
                                                docker stack deploy -c /root/arsalan/workdir/mirbozorgi_pipline/docker-compose.yml mirbozorgi
                                                docker service update --force --image arsalan/mirbozorgi:latest mirbozorgi_app'''

sshPut remote: remote, from: '.. /mirbozorgi_pipline', into: '/root/arsalan/workdir'
            sshCommand remote: remote, command: 'chmod +x /root/arsalan/workdir/mirbozorgi_pipline/deploy.sh'
            sshCommand remote: remote, command: 'bash /root/arsalan/workdir/mirbozorgi_pipline/deploy.sh'
        }

}
}
As you can see, first we made a field called remote and assigned the values of the destination server to it.
Then we enter our settings with the function withCredentials. As you can see in the field
credentialsId: root-jenkins we enter the identifier that we put as a unit in step 1 here.
– The following code is responsible for getting the project file from git:
git branch: ‘master’, credentialsId: ‘e03b3798-0e67-4769-94b3-7d6e69637aaf’, url: ‘https: //.gitlab.com/arsalan/server/mirbozorgi.git’
The credentialsId field is retrieved from the following page in Manage jenkins -> Manage Credential.
In other words, this is the id user of [email protected] in jenkins.
– Then we build a script file with the command code and enter the values that we want to give as the password of the databases or the values to it.
– With the sshPut command, we upload the project to the destination server.
– The sshCommand command first executes the file made in Section 2 and then you have to run it.
Errors in Jenkins:
You may face errors while executing the code.
One of these errors is the error of not connecting to the docker that you have to load your project images on the destination server. For example, in our project, the following images are on the destination server.
Docker
Maven
Redis
OpenJdk
Also you can face errors such as not finding the file or destination folder, which in the script section should either go to the destination folder with the cd command first, or address from the root for each time.
Another error you may face, is the lack of access or the need to use sudo to execute commands. Note that the password you enter to login to the destination server must have root access.