
What you read in this article:
All about CloudFlare:
I, Arsalan Marburg, intend to talk to you about Cloudflare in this article and explain its role in improving the speed and security of sites. We begin this article by talking about CDN.

What is CDN?
CDN is a site control system used by server resources. This system protects the data and information on the website against various cyber-attacks. The DNS on the CDN also increases the loading speed of the site, and this in general has a great impact on increasing user satisfaction with your site. The CDN actually covers one of the most popular types of Cloudflare. This system greatly increases the speed of the site by reducing the amount of bandwidth consumption. On the other hand, it blocks all incoming spam to your site and thus makes your site resistant to various attacks.
In some cases, the hosting of your site may be in another country, and for this reason, the speed of your site may be very slow. In this case, Cloudflare will store the various copies of your site discovered in the data centers of the areas closest to you, and your site will load faster through these data centers.
Using this method, CDN stores various fixed information such as images in nearby datacenters and retrieves various variable information such as HTML code from the main server. This reduces the bandwidth consumption of the server and increases the loading speed of the site.

CloudFlare datacenters:
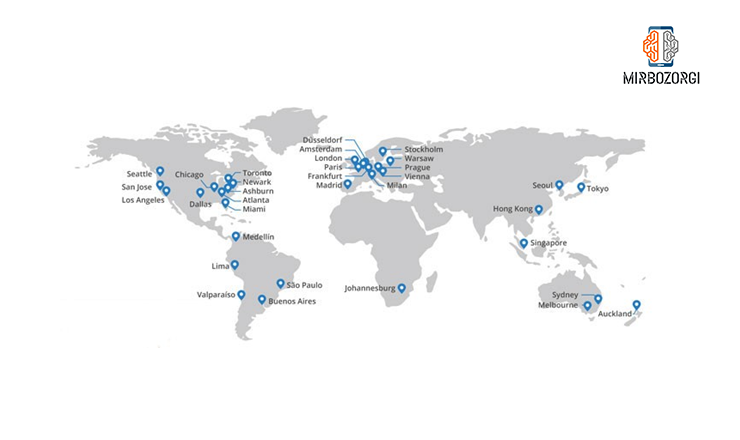
In the image above, which is received from the Cloudflare site, the main route of website traffic through the Cloudflare network is completely clear. The network has about thirty-four data centers around the world that all Iranian users who use American hosting can use the Cloudflare to increase the speed of their site and also reduce bandwidth consumption.
How does CloudFlare prevent spammer attacks?
We have already acknowledged to you that Cloudflare can prevent spam and attackers from entering your site. But you may be wondering how this is done. The cloud is like a protective barrier between a main server and a site. Also note that using DNS, cloud and IP of your main server will not be accessible by hackers. This is done through the cloud’s internal firewall, and in contrast, if you do not use the cloud on your site, the site information and IP server are easily provided to the DDOS attacks through various tricks. The image below shows an example of an attack on a target server via insecure DNS.

In the next part, the Cloudflare system is on the server. In this case, after understanding the attack of insecure DNS, these DNS are blocked as soon as possible and the process of attacking again to the server is prevented.
What are the advantages of using CloudFlare?
Using Cloudflare, has a lot of benefits, which we will mention below.
- Connecting to the nearest server for loading the site and uploading content via CDN activation
- Activate the site on 24 hours, through the caches available on the Cloudflare server
- Site optimization with reducing bandwidth usage
- Increase site speed with compressing JavaScript, CSS and HTML code
- Increasing site security by repelling Protection DDOS and Injection SQL attacks and preventing spam requests from having access to the site
- Having a traffic analysis system in order to manage site traffic and visits better
- Refresh caches with the Cache Purge feature
How to enable CloudFlare?
To activate, follow the steps below:
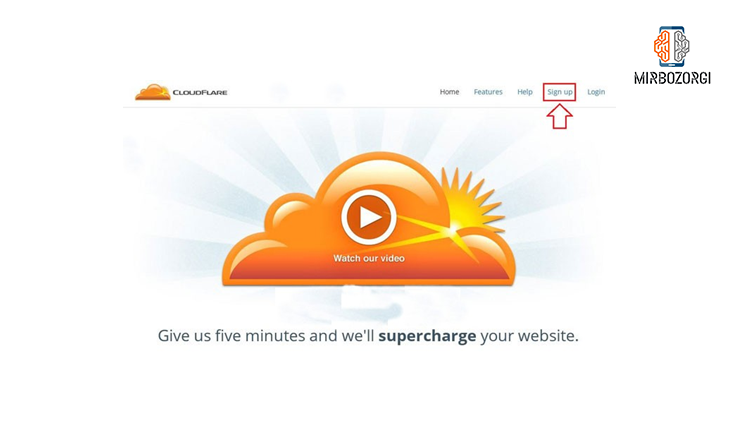
1 . First, login to the official CloudFlare site.
2 . Click on up Sign to create a new account.
-
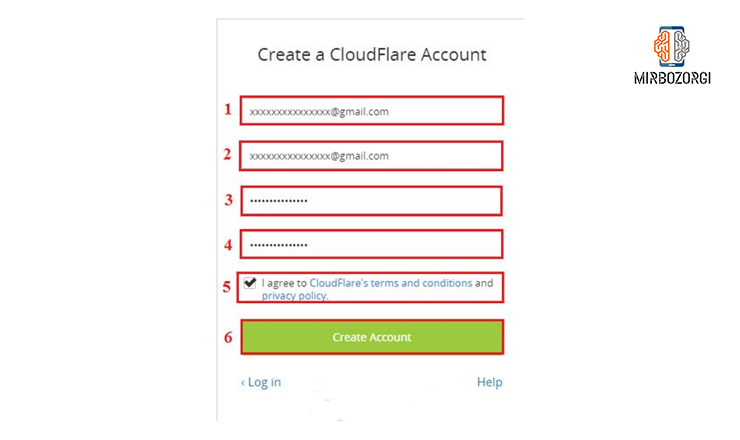
In the page that opens in front of you, enter your favorite email address and password, and finally, by confirming the rules on the site, click on your account Create
-
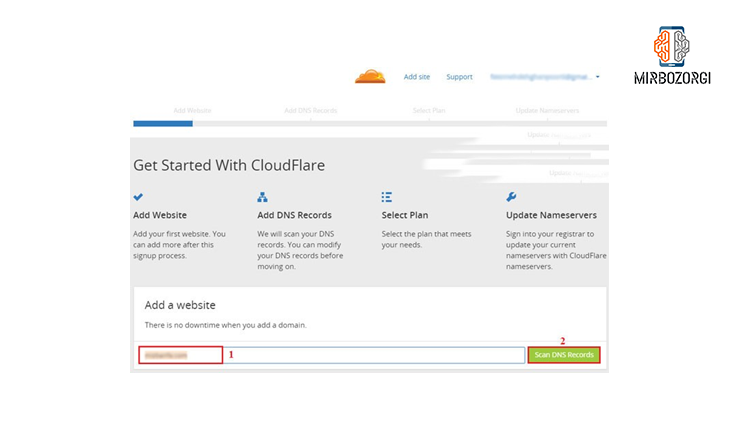
After creating your desired account and logging in to your account from the Add a Website section, enter the name of your desired website and then click on the Records Scan DNS option.
-
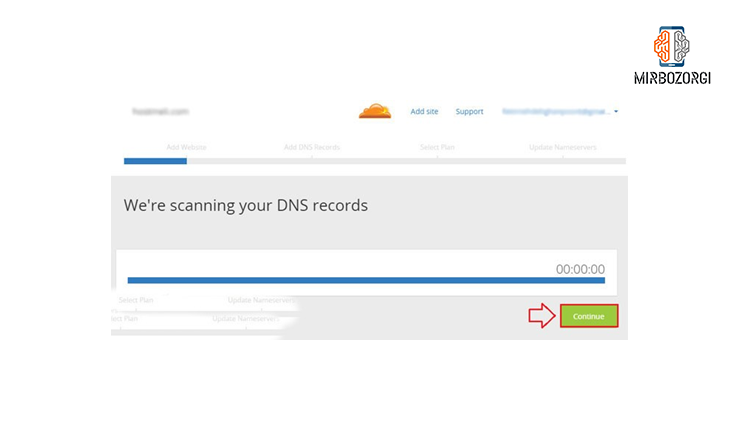
After a period of about one minute to check the DNS records of your site, click on the Continuous option.
- The next section displays a complete list of all DNS records in your domain. Your subdomains are also fully displayed. If you want to create a history, you can click on the Record Add option.
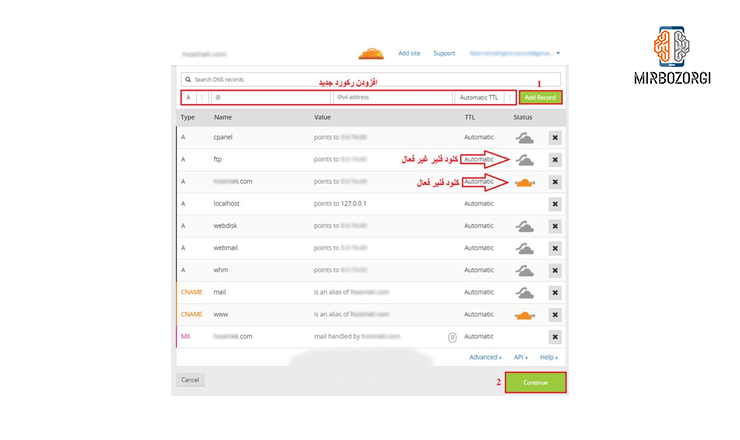
At this stage, all the records on your site will be displayed automatically. If any of your records are not displayed, you can create them yourself. In this case, you must also enter the IP of your site so that you can access all the records in full. In addition, in this step you can specify on which subdomain and your DNS history, cloud is enabled and disabled. Note that all items are highlighted in orange and gray. Orange means active and gray means inactive. This action can be changed by clicking on the clouds in the photo above. Pay Attention to this point that the cloud is not created on records such as AMX. If you do not see any clouds in front of the records, it means that you cannot activate the cloud in this area.
-
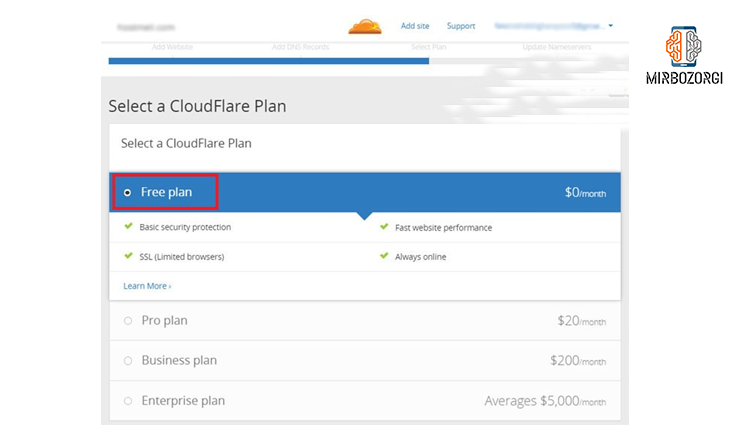
Next you need to specify the type of plan you want. There are usually many free and varied features of the free Cloudflare plan, but if you want to have other plans, you can use them for a fee. To select a free plan, you can click on the free plan option and continue the process option.
-
After that, Cloudflare displays two new DNSs on your site domain. You must set the DNS for your site domain to the DNS provided by Cloudflare and delete the previous one.
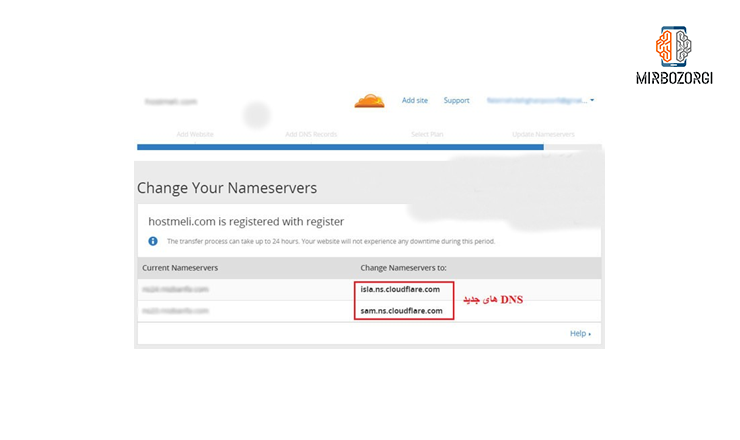
For domestic domains, you should do this by logging in to the site http://www.nic.ir or the registration center of Iran’s first-class domains. For international domains, this should also do through the domain registrar user area. for example, by making change in the Host control or domain DNS. Note that it usually takes 24 to 72 hours for Cloudflare to make changes and fully configure DNS. After passing this step, click Continue. After that, you will be taken to the main page of the site. In this case, the status of your site is in pending mode and the mentioned time should be pass to apply the changes. In this step, by clicking on Nameservers Recheck, you can know the status of DNS.
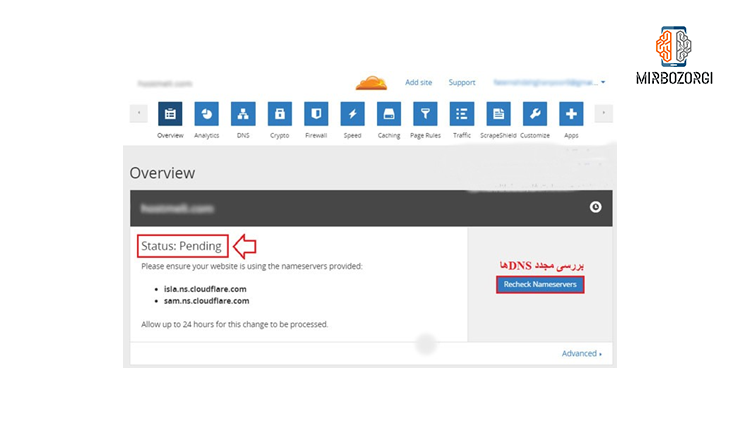
After the timer is up and changes are applied to your site, the site status becomes Active.

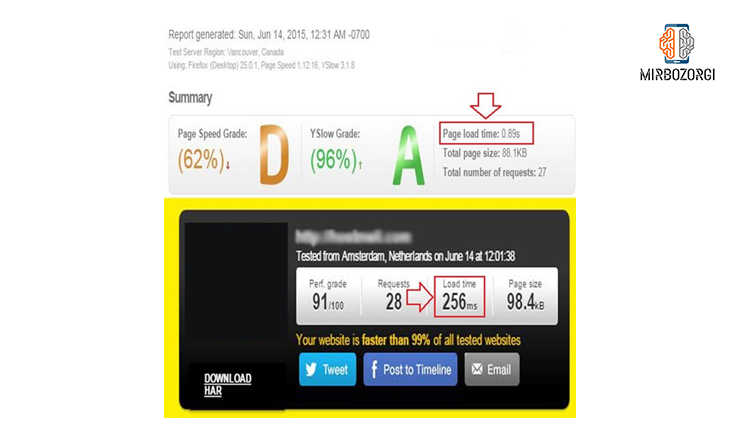
You can enter your domain in one of the gtmetrix or pingdom sites to write a change in the loading speed of your site, before activating Cloudflare on it and note its loading speed to compare in Cloudflare activation mode.
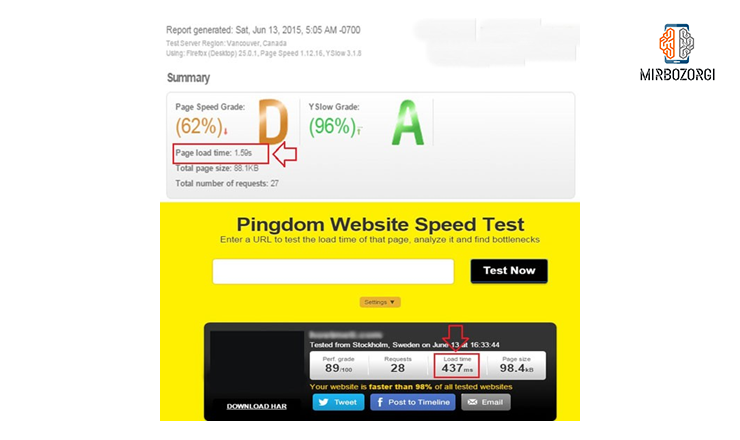
After you activate Cloudflare, you can check the loading speed again through these very two sites. (In this part, the speed has changed from seconds to milliseconds.)
Practical Tips:
Checking the status of the site through Analytics
In your account, log in to the Analytics part.
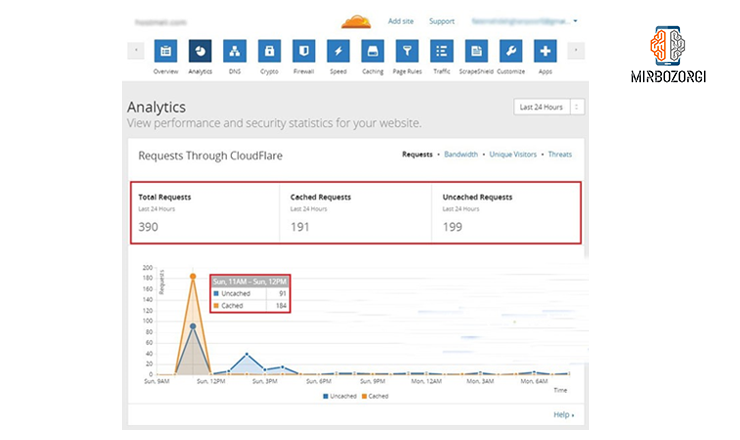
In this part, the number of requests to enter your site are shown along with related charts.
In the Performance section, you can find the amount of there is no need to visit the main server due to the use of cache servers, the amount of bandwidth savings, site content, the total number of threats stopped against the site, the amount of incoming traffic via SSL, which includes secure request and insecure ones and finally see the reduced threats.
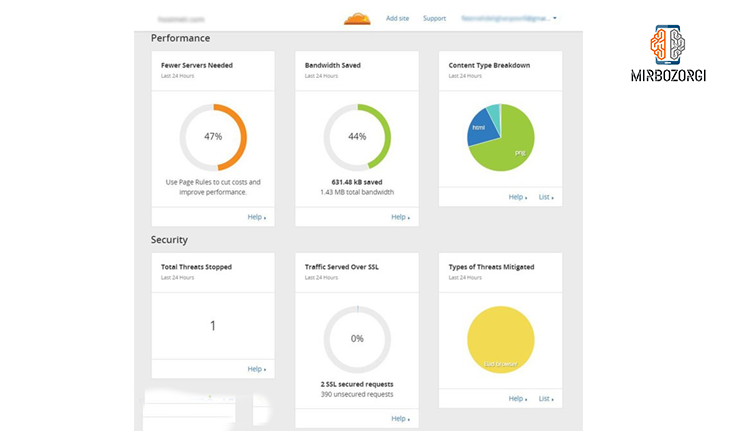
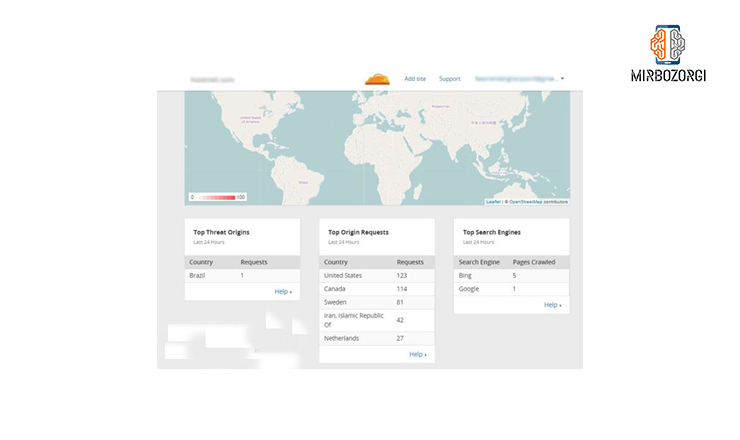
Also, in this section, you can see statistics on the number of requests from IP of different countries and search engines.
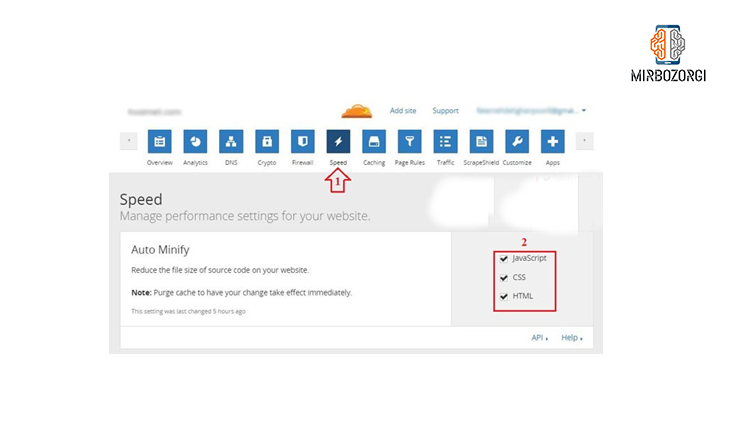
You can also compress HTML, the speed tab, CSS and JavaScript files in the Analytics section. To do this, enable the HTML, CSS and JavaScript options in the Minify Auto section.
Do this act if you want to make quick changes to the cache on Cloudflare via the Caching and Cache Purge section.
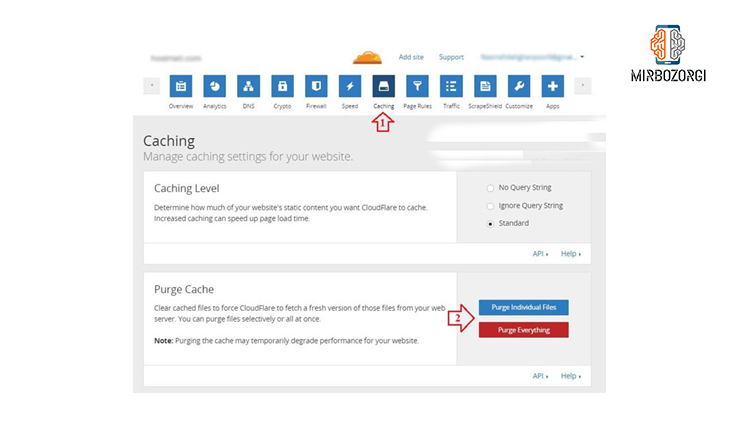
The Purge Individual File section is used for a specific section of the site to be refreshed.
The Purge Everything section is used to refresh the entire site.
How to use Firewall in CloudFlare?
For this purpose, log in to the Firewall section in your account.

Using this tool, you can define new security roles for your site. Through this section you can define various activities such as defining authorized and unauthorized IPs to access the site and more. Note that the IP firewall section can be used in the free Cloudflare plan, and the application and web firewall section can only be accessed in the professional plan. DDOS protection features are also available in the business plan. According to these cases, if you need advanced plans and features, you must purchase your account in the Cloudflare, and by using the IP firewall section, you have the ability to completely block unauthorized access to your site. You can set this section according to various security issues.
We urge you to refrain from making settings that you do not trust without sufficient information in this regard.
Determining the site review time period for refreshing caches
Note that the time interval for reviewing your site by Cloudflare can be changed and you can consider any desired interval you like for this. But we recommend that you do not set them at short intervals. To select the time interval, you can enter the Caching section from your account and select the time interval of your choice from the Expiration Cache Browser.
And in the end,
In this article, we tried to acquaint you with the concepts of CDN and Cloudflare and tell you how to create a Cloudflare account and how to apply some changes to Cloudflare. We also told you that some of the advanced features are related to the plans that can be purchased, which you can take advantage of by purchasing them.